Here is the original blog post over at Lumberjocks.com
Making some progress, better be, xmas is coming soon. Got the raw lumber milled and cut to size.
Here’s the raw lumber.

Pieces milled and cut to size.

Shelf glue up.

Top glue up.

Here is the original blog post over at Lumberjocks.com
Making some progress, better be, xmas is coming soon. Got the raw lumber milled and cut to size.
Here’s the raw lumber.
Pieces milled and cut to size.
Shelf glue up.
Top glue up.
Here is the original blog post over at Lumberjocks.com
Still working on redrawing the plans and I came across an anomaly. The back and sides are solid wood panels. The side panels fit tight edge to edge. The back panels have a 3/16 gap between the panels and the posts. I could believe the gap is for wood movement, sounds reasonable, but then why not in the sides. Both the back and the sides are similar grain orientation and both will be subject to movement. I suspect the real answer is that whoever drew up the original plans either wanted tight with no gaps and got it wrong on the back or wanted a gap for wood movement and got it wrong on the sides. Whichever it was it was immediately obvious as soon as I started putting the pieces together in sketchup.
I’ll add some gap on the sides and shrink up the gap on the back. Now that I have my own model I can size it any size I want and print a new set of dimensioned plans as needed.


Here is the original blog post over at Lumberjocks.com
I’m building a beside table / nightstand for my son. I found a set of plans I liked on the net, purchased from PlansNow originally published in Workbench Magazine.

Even though I have the plans I’m still drawing it up in sketchup.
I like to dry run in sketchup. I find it really makes my shop time go faster and I create fewer errors if I’ve walked through the entire cutting and assembly sequence in sketchup before committing.
If I start with a square block in sketchup the size of the surfaced lumber and then remove geometry similar to how I will do it in the shop I can see the sequence of cutting the lumber once in my head before actually cutting real wood. And then I can dry fit all of the parts in sketchup and see how they fit. I can grab a piece of the model and look at it from any angle before I’ve ever cut it and see fully formed before I ever see it in wood.
Here’s a picture of the start of the model so far. Got the posts and the rails modeled up.

The design calls for mortise and tenon joints throughout.

This is not my design, I dont own the copyrights to it so I wont be posting the actual sketchup model. I’m just drawing it for my own benefit.
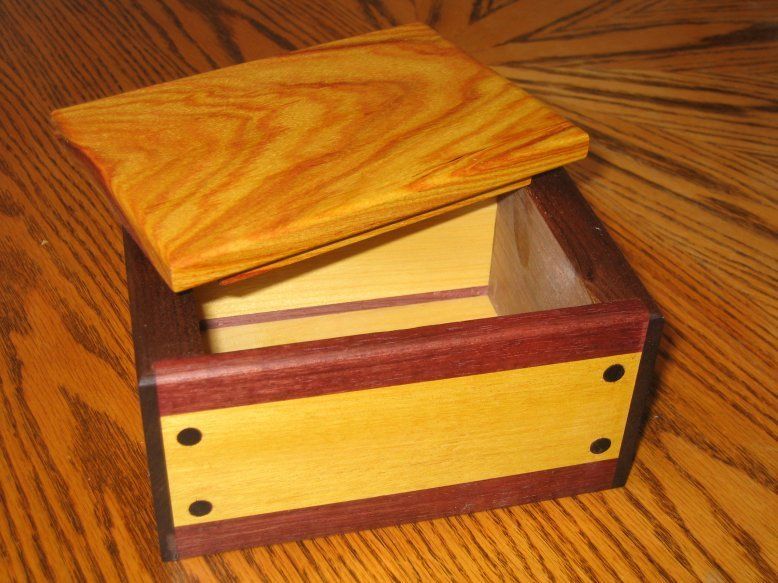
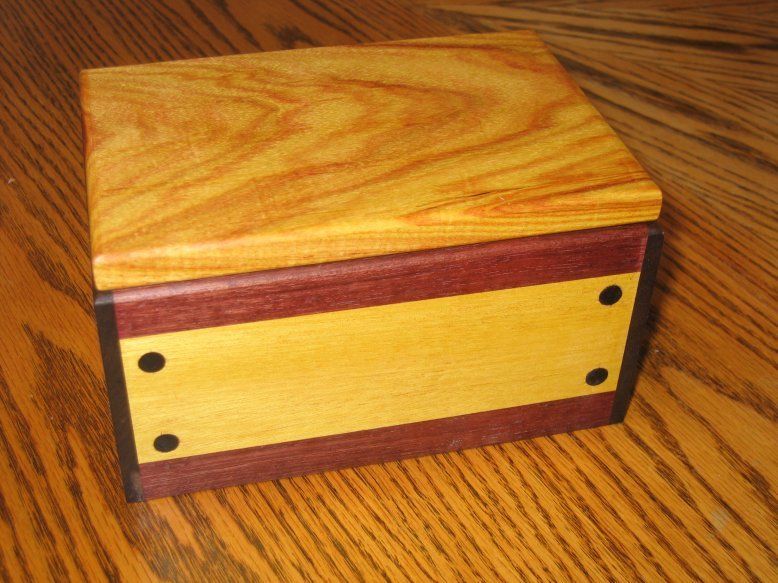
A gift for a friend. A mix of walnut, yellowheart, and purpleheart. The top is canary wood. I made the lid last. If I’d have known how good the canary wood was going to turn out I would have probably used it throughout. The end sides are pretty thick walnut. I made some purpleheart dowels by pounding 5/16 squares of purpleheart through a 5/16 hole drilled in a piece of 3/16 steel. The dowels go through the sides of the box about 1/2 inch into the walnut.


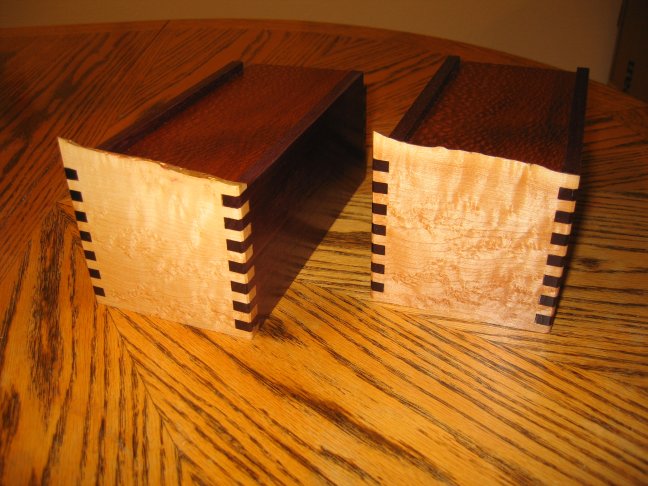
A couple of boxes for xmas gifts. Purple heart sides, leopardwood top, birdseye maple on one end, cherry on the other, and a piece of birch for the bottom. Everything that was sitting in the cutoffs that was about the right size. Two coats of tung oil, a couple coats of shellac, and rubbed with some wax.
When I picked up the maple I rooted around to find a nicely figured piece. When you’re looking for the figure you take what they have and in this case it was the live edge. When I bought the piece I figured I’d just have to clean up the live edge when the time came. When I finally started laying the peices near each other I decided to leave the edge and see how it turned out. I decided I liked it and I’m glad to hear support for leaving it.
To cut the finger joints I use a router table and a solid carbide upcut spiral bit. I found using the standard 2 flute bits, even a shear cut, blew out the exit and end fingers far too often. With a spiral bit and a backing board I dont have any blow out. I dont need to scribe or tape, or support the end fingers.
The jig I use looks exactly like this one at The Router Workshop Boxjoint Jig.
I used a 1/4 inch bit for the two latest boxes. It’s so dang fast and easy I’ve started making sliding lid pine boxes as gift wrapping for other gifts. I use the jig to cut the finger joints, the bottom groove and the top groove for the sliding lid. Pretty much one setup and one tool.
I set the finger spacing to 1/4, then I cut the grooves for the top and bottom 1/4 of an inch in from the top and bottom. I cut the grooves 1/4 inch wide so the bottom is 1/4 inch thick. I do lower the bit when cutting the top and bottom grooves depending on how thick the sides are.
I do stopped grooves by lowering the piece onto the spinning bit and tipping it up at the end.
If I have a thin lid I’ll cut the top grooves on the table saw at 1/8 inch from a single pass on a standard kerf blade.
Minimal setup variations. It’s not a production setup but I do try to minimize the change up. Makes it faster and easier for me and lowers the chance that I’ll mess up a step.
In reply to post Tapered Box
Don K. replied:
Beautiful…bet she will like this almost as much as the pendant. I real keep sake !!!!
scrappy replied:
Very nice box. Like the tapered sides/lid and great choice of woods.
Keep it up.
TopamaxSurvivor replied:
Fantastic!! Definitely beats a cardboard box :-))
trimtrac replied:
That’s a nice box. I need to read that fellows book
blockhead replied:
Beautiful job! Love the design and choice of woods.
ellen35 replied:
Great box! Design and execution outstanding…purpose noble!
SPalm replied:
Very nice take off on a classic box. Well done.
Tapering the sides must have been exciting. Especially the forth side. Any tips on how you did it, as in how you held it while slicing?
Steve
patron replied:
beautifull box !
simple and elegant .
i think i hear quasimoto ,
tuning his bells ,
for the big day !
jockmike2 replied:
Very beautiful box. unique too.
michaelray replied:
Great looking box. Nice choice of colors and excellent job on ‘wrapping’ the grain around the sides.
jhawkinnc replied:
Very nice! You’ve set a big precedent for all future gifts, though. 🙂
Innovator replied:
Beautiful box.
SnowyRiver replied:
Great work. Beautiful.
majeagle1 replied:
A real pretty box !
I love the spalted woods and the padauk adds the right contrast and really makes it stand out.
The tapered design is very nice also………. Job well done, thanks for sharing.
dustyal replied:
Nice job making wrapping paper… lol. I enjoy browsing and picking up on box ideas. Thanks for including the part on how you tapered it… I’m an amateur and probably would have tried to cut the tapers, then mitered.. and then.. toss it all out.
So, the side walls are thinner at the top than at the bottom—maybe tapering in thickness from half to three quarter thick? Box isn’t so tall that your saw depth could cut all the way from top to bottom? I might need to try this on some cheap poplar first…
Thanks for sharing…
ratchet replied:
Nice box! I really like the spalting and color contrast. What keeps the box lid from seating all the way?
coloradoclimber replied:
Thanks all for the kind comments. It was a fun box to make and cranked out pretty fast.
Simple answers first. The lid has a small step set back from the outer edge to keep the big part of the lid lifted off of the box. The idea was to have a small gap so the lid looks like it is “floating” just off of the box. You can only see the gap from straight on or lower but if she sets it on a high shelf you should be able to see it. Or maybe it will be a design element that will never be noticed, except by another woodworker :). I cut the rabbet around the lid on the table saw, cut with the lid flat and then with the lid on edge. I made the two cuts shy of meeting in the corner so it left the step all around the rabbet. The lid just barely fits into the box so the lid stops high and rests on the step leaving the small gap.
Yep, the box tapers from thick at the bottom, 3/4 of an inch or so at the bottom to maybe 1/2 inch thick at the top. The box is a typical mitered corner box made from 3/4 or so stock. It looks pretty thick and clunky before it is tapered. Add in the miter keys while it’s still square using a standard 45 degree sled run over the table saw blade. I even cut the lid square and sized the rabbet and step while the box was square. Once it’s all dry you cut the tapers.
Cutting the tapers was the slightly tricky part, not a big deal but that’s a lot of blade exposed. First I did a quick pass with a block plane over the miter keys to get the sides mostly flat. I did not have to worry about scuffing the sides since I was about to slice them off. Mostly the sides need to be reasonably flat so you can register a side against your miter fence.
I like to make my cuts so that the off cut falls away under the tilted blade. I dont like the idea of an off cut riding free on top of the spinning blade. So since I wanted the off cut to be on the bottom side of the blade I had to cut the sides with the box upside down. The open top of the box was riding on the table saw table with the blade tilted away from the bottom of the box. The first two cuts were pretty easy and pretty safe. Since the box is still square sided at this point I pushed one flat side against the miter fence and put a F clamp on it to hold the box against the fence. I then sliced off one end. Flip the box around to get the other flat face against the miter fence, clamped it, and sliced off the another face.
That left me with a box with flats on two sides and tapers on two sides. Now comes the dicey part. Freedman’s book suggests making tapered seats for your miter fence and opposite clamping face so you can get a good clamp while holding the tapered sides. That sounds like a good idea to me, that’s my recommendation for anyone else trying this. I ended up free handing it for the remaining two side. I held the upside down box with the tapered side against the miter fence and sliced off the other two sides. It was a little spooky but mostly I kept my dang fingers back and crept up on it gentle, that’s a lot of blade exposed.
Dusty56 replied:
This is Ambrosia Maple , not Spalted Maple if you want to correct your post.
If you notice , the little holes in it are left behind as the Ambrosia Beetle grub bores its way through the Maple tree . The staining is a reaction by the tree caused by the boring process.
Spalted Maple is characterized as black “pencil” lines caused by a fungus in the wood as the tree starts to decompose.
Very nice gift box and you did a great job matching the grain on the corners : )
Blake replied:
So cool. Love the shape, love the colors, love the wormy figure.
coloradoclimber replied:
Dusty,
Thanks for the heads up. I’ll have to do a little more research and correct my postings. I bought a few sticks of this maple, saw the bug holes, saw what looked to me like spalting, and assumed that was what it was. I did not realize the beetle tracks also resulted in staining like this.
coloradoclimber replied:
Dusty,
After some “quick” research, so don’t hold be too strongly to this, I think there is some confusion.
I could not find a formal definition for spalting but the consensus seems to be something like:
”Spalting is any form of wood coloration caused by fungi.”
and
”Spalting is caused by the infections of wood with various kinds of white rot fungi. The characteristic blue-black zone lines of spalted wood form when incompatible colonies of fungi come into contact with each other and lay down barriers to separate their territories.”
I also read:
”Ambrosia beetles are beetles of the weevil subfamilies Scolytinae and Platypodinae (Coleoptera, Curculionidae), which live in nutritional symbiosis with ambrosia fungi and probably with bacteria. The beetles excavate tunnels in dead trees in which they cultivate fungal gardens, their sole source of nutrition. After landing on a suitable tree, an ambrosia beetle excavates a tunnel in which it releases spores of its fungal symbiont. The fungus penetrates the plant’s xylem tissue, digests it, and concentrates the nutrients on and near the surface of the beetle gallery.”
So based on this my take is spalting is the more general term. A fungus discolored wood is spalted. How the fungus got there is more specific. It sounds like the ambrosia beetle carries a particular fungus that it likes and that fungus causes splating. From my read it doesn’t sound like the boring so much causes the discoloration as the fungus spores carried along by the beetle as it bores around.
So I would say this maple is spalted. It may be the particular spalting comes from the fungus carried by the ambrosia beetle so it might be more precise to say ambrosia maple but my read is that spalting is a more general term and is correct.
An interesting side note:
”Dark dotting, winding lines and thin streaks of red, brown and black are known as zone lines. This type of spalting does not occur due to any specific type of fungus, but is instead an interaction zone in which different fungi have erected barriers to protect their resources”
SPalm replied:
Mr. Climber,
Your explanation is correct and how I had always heard it. It is the fungi doing the discoloration and spalting, no matter how it got there. (My first wife is one of the country’s top fungi experts).
I was also told that wormy wood was named because of the holes and tracks laid down by insects, not the color variations. But I have seen several hits on the web that use these interchangeably.
Steve
Dusty56 replied:
Perfect example of SPALTED MAPLE http://hobbithouseinc.com/personal/woodpics/maple,%20spalted.htm
Perfect examples of AMBROSIA MAPLE http://www.haleydaniels.com/maple-ambrosia.jpg
as known to 99 and 44/100% of woodworkers that have seen both.
I am not denying that a fungus causes both the streaking and the lines, however, your box is made from Ambrosia Maple is all that I’m saying.
Notice that there are NO holes in the actual Spalted Maple sample picture, just the black lines that I mentioned before.
I have also recently seen Curly Spalted Ambrosia Maple for sale, but you could clearly see all of the individual figures in the wood. ie: the Curl, The Spalted areas and also the Stained areas from the Ambrosia Beetle boring through the wood and introducing its particular fungus in its wake.
Let me put it to you this way … if you said that you were building a table out of Spalted Maple and needed just one more piece of it to make a replacement front leg and I told you that I had one for you and then showed up with Ambrosia Maple ….what would you do ? Ooops , sorry I forgot that they are the same thing to you. Bad example…..I’d use Oak for an example , but you probably think that Red and White Oak are the same thing as well.
Better yet , what if you had sent your wife to the lumber yard to get it and she came home with the “other” one? Would you say it was Ok to her because they are the same thing in your eyes?
Hmmmm…Squiggly pencil lines versus beetle holes and staining…Oh my!!
— When you arrive at my front door, please knock softly but firmly. I like soft , firm, knockers : )
coloradoclimber replied:
It seems to me the fault would be mine. If I told my wife to “just pick me up some oak” and she brought home whatever was at the store, red or white, she would be without fault (which if you’ve ever been married had better be the answer on the tip of your tongue :)).
If I want something specific the burden is on me to specify what I want. If I want wormy maple or beetle kill or ambrosia beetle infected maple the burden is on me to make that clear. If I want spalted with no beetle holes or worm tracks I better specify that. If I just want some moldy old wood I guess it wouldn’t matter.
It may be that 99.44% of all woodworkers who ever viewed the infinite varieties of fungus infected maple would immediately and without hesitation assert with great vigor the unique differences between beetle infected and simply rotted, I’m not that wound up. Although I do question your statistics. A simple google search did not turn up a clear and definitive answer, nothing on the order of 99.44%. Or maybe google just happened to divert me into the ignorant 0.56% of the definitions and web pages.
If 99.44% of woodworkers like to call this wood ambrosia maple, I’m cool with that. I agree that ambrosia maple seems to be a more precise answer. It seems clear the spalting in this wood is directly related to being infested by the ambrosia beetle. It is still not clear to me this is not spalted maple, looks pretty fungified to me. Anyhow, if you want to call this ambrosia maple and you think my calling it spalted maple displays an ignorance vast beyond measure, I’m cool with that too.
As a near meaningless side note the lumberyard where I purchased it had a whole stack just like this and it was labeled and sold as spalted maple.
Dusty56 replied:
http://www.turningblanks.net/servlet/the-Ambrosia-Maple/Categories
”displays an ignorance vast beyond measure”…..I would never say that about you. I will however say it about the lumber company that you say is selling this as Spalted Maple.
I was only trying to point out that your particular “spalting”as you call it , was due to the Ambrosia beetles activities. That is why it is known as Ambrosia Maple.
Check out these links that clearly distinguishes one from the other.
http://www.heirloomwoodcrafting.com/sawmilling_spalted.htm
http://www.heirloomwoodcrafting.com/sawmilling_ambrosia.htm
Also , Spalting occurs from a fungus reacting with a dead or dieing tree whereas the Ambrosia Beetle staining is spread throughout a living tree by the sap flowing through the wood fibers.
coloradoclimber replied:
hmmm,
I’ll have to investigate that when I get a few more moments. If things are as your last sentence suggests, “Ambrosia Beetle staining” then that may be different that spalting.
If the discolorations are caused by something other than fungus, some staining that is unique to the attack of the ambrosia beetle, then is seems reasonable to differentiate ambrosia beetle stained wood from general fungus discolored wood.
From what I read, albeit limited reading, the marks, lines, and discolorations in the beetle infested wood are from the fungus carried by the beetle. The discolorations are caused by the fungus and therefore fall under the general heading of spalting, that is assuming you believe the statement ”Spalting is any form of wood coloration caused by fungi.”
If on the other hand the discolorations are caused by something other than fungus there may be more to this.
I will chase your links and see what they tell me. You never know what you’ll learn bouncing off of other people.
bigike replied:
cool box, nice contrasting woods
hershey11 replied:
Thx. This’s useful, as at first glance the farmer may think there is no difference.
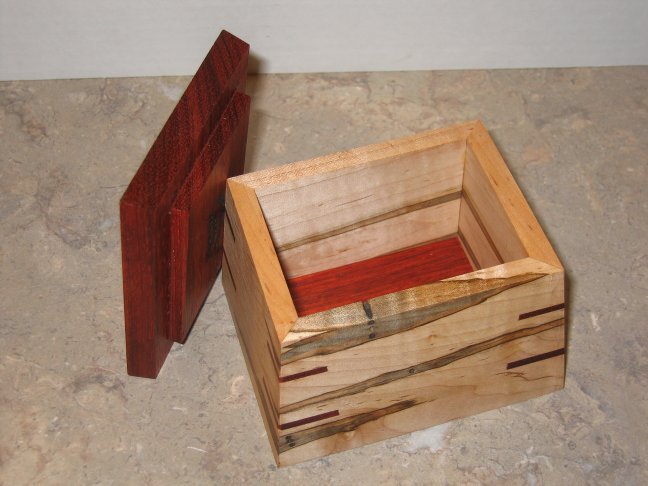

I made this box for my lady friends birthday. The box isn’t so much the present as a container for the present. I bought her a pendant and I wanted more than a cardboard box to give it to her in. So I whipped this out.
The woods are ambrosia maple and padauk. I had already been planning on using the maple. She likes maple and I had this nice piece sitting in the shop. The idea to use the padauk came from Phil’s Oak Box with Padauk Lid project. I really liked the colors and thought the padauk would work well with the maple.
The decision for the tapered sides came from the book “Box Making Basics by David Freedman”. I knew the same old straight side box wasn’t going to cut it. I had to jazz it up a little. The tapered sides and top give it a little different look and hopefully make it a little more visually interesting.
The box is made as a standard straight walled mitered corner box with standard identical miter keys top and bottom. After the glue dried I raised the table saw blade as far as it would go, tilted it 6 degrees and sliced all four walls of the box. The lid is tapered at 10 degrees. The lid is short compared to the box so I had to give it more taper so it didn’t look straight up and down.
The finish is a single coat of pure tung oil thinned 50/50 with turpentine.
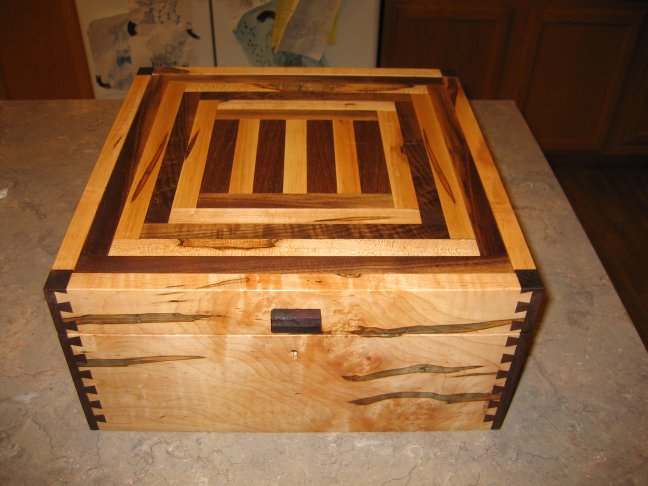
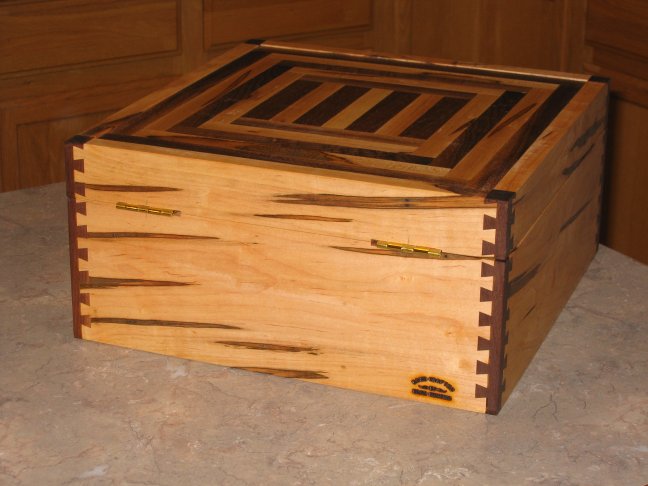
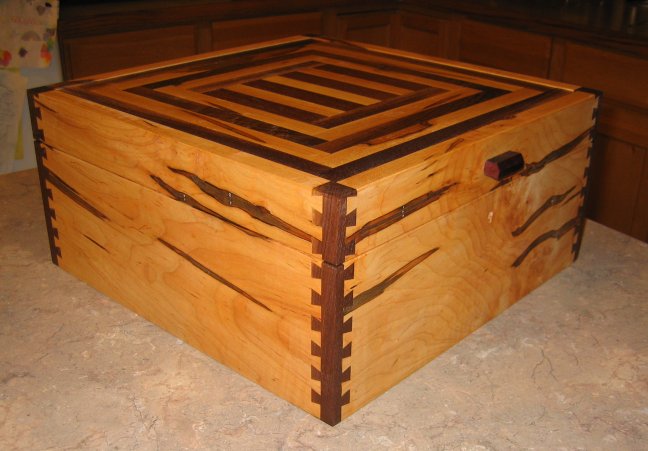
My daughter is a letter saver. She probably has every card, note, and random letter she has ever received. Heck, she probably has the actual winning Ed McMahon Sweepstakes letter crammed in there somewhere.
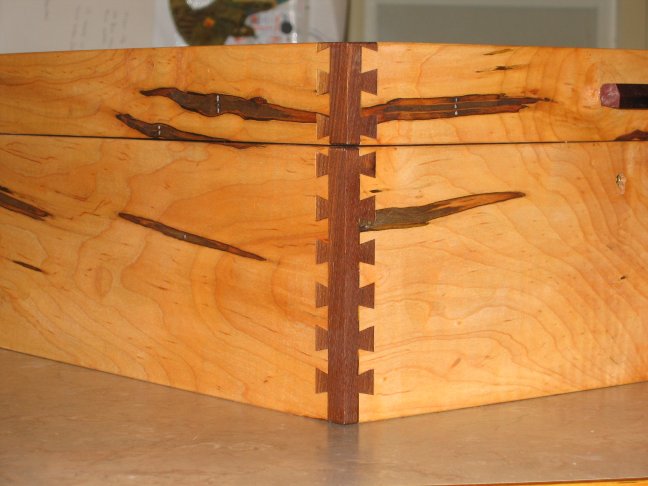
Anyhow, she needed something to put them all in, and since they are important to her I thought something more than a cardboard shoe box was in order. I put in a lock so she could keep them private if she desires. The woods are ambrosia maple and walnut. The dovetail corner post was cut using an incra router jig.
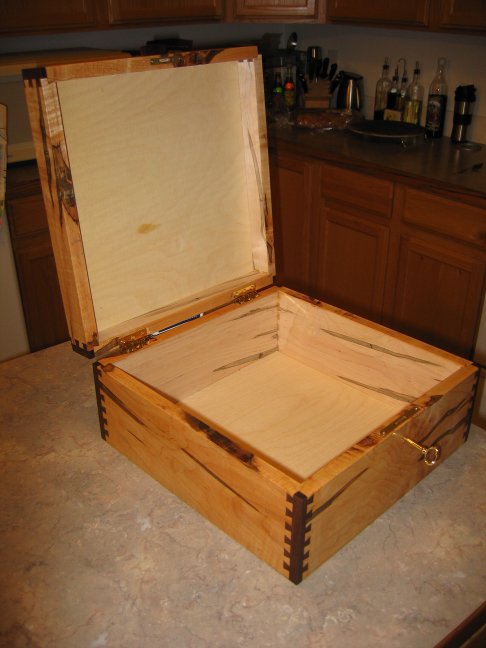
Here is the original project posted over at Lumberjocks.com Secret Boxes


About this time last year a friend showed me a little wooden box she had. She knows I’m a woodworker and she said “I’ll bet you can make these”. I took a quick look and thought, yeah, these look pretty simple, I probably could. My next thought was, hmm, christmas is coming up, and I need some presents, and these little boxes look pretty simple and pretty cool…..
And so a whole batch of little boxes were born. Unfortunately I gave most of them away without taking any pictures. They were a huge hit with the ladies, young and old, from little girls to little old ladies, they all delighted in these little boxes. Then you tell them these boxes are called “secret boxes”, their eyes light up.
So with christmas coming up again I cant really make and give these away again (the bar gets higher every year) but I thought some of you LumberJocks might be interested.
These boxes are called secret boxes, I understand the name comes from the idea that if you use the same wood for the lid as the body the lid becomes hard to see and supposedly not obvious how to open (seemed pretty obvious to me, and to the little ladies, one and all). So not so secret but everyone still likes the idea.
The box is basically a hogged out piece of wood with a sliding dovetail for a lid. The box itself is dirt simple. Take a piece of wood, hog out the center, cut a sliding dovetail, make a dovetail lid, assemble, done.
(box body)

(box lid)

I made two sizes of boxes, the big ones are about 3/4 x 2 x 5 inches or so. The small boxes about 3/4 x 2 x 2 inches. The lids are about 3/16 thick.
Since I was going to make a bunch of them I decided I needed a jig or two. The trick to make this more of a production operation is to make a jig to hold the boxes for hollowing them out. The jig is made out of a piece of milled square 2×4 cut to the same length as the box with a groove cut in it the same depth as the box. You then screw a router template to the top and you have a hollowing jig to hog out the centers. I’ll get to the jig in a second.
First you start out with raw blocks of wood milled to the final outside dimensions of your box and final thickness of your lid. Contrasting wood for the lid really stands out.
(wood blocks)

*Step 1*: Cut the groove for the lid into the body of the box. Cut the groove a little narrower than the narrow part of the dovetail of the lid. I used a straight bit in a router table. You could very easily use a dado blade if you have one that cuts a flat bottom. Now you have a block of wood for the body with a groove cut in it about 3/16 of an inch deep (the thickness of the lid) and (for my boxes) maybe an inch and quarter wide, right down the center of the box. I used my router table, a straight bit, my fence, and a captured cut. I know, I know, I know, no captured cuts (if you don’t know what a captured cut is google it. It’ll probably tell you *not* to do it). And yes a couple boxes did get away from me and got ruined. If you’re gonna do a captured cut for goodness sake use pushblocks and keep your fingers back.
*Step 2*: I suggest hollowing out the inside of the box next, before cutting the dovetail. Once you cut the dovetail you’re going to have a nice sharp dovetail edge. If you cut the dovetails first and then hog out the box you run the risk of dinging the dovetail edges and it really ruins the clean joint. To hollow out the boxes I made a simple jig / template for a hand held plunge router. The jig consists of a milled square piece of 2×4 cut to the length of the box with a groove cut in the middle just barely larger than the outside dimension of the box. A router template is screwed to the top of the 2×4.
(jig side view)

To use the jig the box is slid into the jig from the end
(jig with box inserted)

The jig is then clamped into your bench vise. Clamping in your bench vise serves two purposes. First the whole jig and box are rigidly held so you can route it. Second the jig sides are flexible enough that clamping the jig compresses the jig sides and clamps the box tightly in the jig.
(box jig clamped in bench vise)

The template needs to be exactly centered over the groove in the 2×4. It should be exactly centered front to back and side to side. OK, not really. Since I couldn’t get the template *exactly* centered over the groove I cheated and made the jig _adjustable_. Lengthwise the jig is not a problem. The box can be slid from end to end until it is centered under the template cutout. When the jig is clamped in the bench vise the box will be held in place. For side to side adjustment I cut the groove in the jig about a 1/16 to 1/8 over size and used shims to center the box. I used some thin wood slivers and some strips from some old business cards to get the boxes exactly centered under the template cutout.
Just stack up enough shims on either side until you get the box centered. Once you figure out the shim sizes for the stack of boxes you have milled up it’s pretty fast and repeatable.
Once I had the jig and box clamped in the bench vise I used a 1/4 inch solid carbide up cut spiral straight bit and a router bushing sized to the template cut out. I used a plunge router with a turret stops and routed out the box in a series of maybe 3/16 ths of an inch increments. Plunge the router, route out the interior of the box within the template, lift up, rotate turret to next depth increment, repeat. Keep going until you’ve routed down to leave yourself about 1/8 th of an inch thick bottom in the box.
So now you’ve got a box, with a groove where the dovetail is going to be, and the cavity of the box hollowed out.
*Step 3*: Cut the dovetails in the box. I used a 14 degree dovetail bit mounted in my router table. In order to get exactly the same cut on both sides of the box I did a captured cut between the bit and fence. The fence references the side of the box and the thickness of the dovetails to the edge of the box is the same on both sides. Again, use push blocks and caution if you choose to use this method.
Now the box body is pretty much done. The box is hollowed out and the dovetail is cut in the box.
Now to make the lid. To make the lid I picked a contrasting wood. The one shown here is maple for the box body and zebrawood for the lid. Maple and bloodwood was my favorite.
*Step 4*: I first cut a block of wood from some 4/4 stock just a bit over the lid width, maybe 1 and 3/4 of an inch wide. I jointed one surface and edge and resawed a strip maybe a 1/4 of an inch thick. I then planed it down to the final thickness, about 3/16 ths of an inch. I then took that strip of wood to the table saw and ripped it to just a hair over the final maximum width of the lid at the widest part of the dovetail.
Back at the router table, with the 14 degree dovetail bit still in place I routed down the edges. I did a standard cut with the fence to guide me. I had the fence moved out to just expose enough of the bit to just cut the dovetail. Once you have the dovetail cut you start fitting it to the box. I cut my lids slightly oversized and made multiple passes over the dovetail bit, just barely trimming the lid, until I got a perfect fit.
A perfect fit, that requires a comment. What is a perfect fit? A perfect fit is one that is snug enough that the lid stays firmly in place when the box is tipped, that provides firm resistance when closed, but is not so snug that when the wood swells the next summer the lid gets firmly wedged in place. You might wonder how I know this. Well along about the next spring I was back in the shop doing some lid tuning so the recipients of these boxes could get the lids off. As soon as the lids swelled they wedged TIGHT. They were tough to get out. I just hope I didn’t trim off so much that come next winter they don’t shrink so much the lids fall out.
*Step 5*: Now that the lid is dovetailed to a perfect fit, cut it to length and slide it into the box. Take the box with the lid in place and treat the box outside edges as you want. I used a 1/2 inch radius round over bit in my router table and went all around the outside edges of the box. If you route the edges do it with the lid in place. This insures the lid edge treatment is a perfect fit with the rest of the box.
Here’s roughly the workflow:
– Decide the dimensions of your box and lid and make a jig / template.
– Cut and mill a stack of blanks for the box bodies.
– Cut and mill a stack of blanks for the box lids.
– Groove the top of the boxes for the lids, slightly undersize. Router table with straight bit or flat bottomed dado blade.
– Plunge route the box, hollowing out the box body.
– Dovetail the box for the lid. Router table with dovetail bit.
– Dovetail the lid. Slightly oversize and work you way down to a perfect fit making multiple passes.
– Trim the lid to length.
– Edge treat the entire box. Router table with round over bit.
And there you have it. If you make a jig and set yourself up with a planned workflow you can crank out a stack of these boxes in pretty short order. Hey! Christmas is only a couple months away, you better quit sitting here reading and get out in the shop and start making boxes!!
Here is the original question thread posted over at Lumberjocks.com
how do you glue / epoxy knife scales on ? Mine fell off
coloradoclimber asked the question:
I bought some fixed blade knife kits from Woodcraft to make for Christmas. The “kit” is really just the blade, I have to add the scales and rivets.
I cut the wood for the scales, sanded the inside, sanded the blade tang, cleaned both the scale and the tang with acetone, mixed some two part epoxy, spread a thin uniform coat, then clamped for 24 hours.
I got the scales thinned to the thickness I wanted and was starting to shape them when the first scale popped off. I checked the other side and sure enough I could see the other scale was coming loose too, a quick poke with a pocket knife under the scale and it popped off too. I checked the others and I could see that at least 3 more were starting to pull loose. I tested them with a pocket knife and they popped off with a little prying. They probably would have held in place for a while but likely would have come off eventually.
So, now what? I’ve already shaped the scales and I would like to use them. I can epoxy them back on but I’m not sure what went wrong the first time. I made 4 knives, the first has wenge scales and those seem to be staying on. Two have cocobolo and 3 of those 4 scales are off. The last was chakte viga, that’s the one that popped both scales off first.
I thought maybe it was the wood, that the epoxy was not sticking to the wood because of some oils or something but when the scales popped off all of the epoxy was attached to the scale and almost none on the tang.
Next I’m thinking maybe it is because of moisture content in the wood. I cut the cocobolo and chakte scales from wax covered turning blocks. The wenge I had laying around the shop for a year or so. I did not let the scales sit very long before gluing them. Maybe a couple days Definitely the cocoblolo and chakte scales seem to have a higher moisture content than the wenge. At least they rasp much cleaner without much tearout. I don’t know if that is a property of the wood or moisture.
I’ve already sent a PM to Mark DeCou, it looks like he’s gone down this path more than once.
So what else should I do? How do you glue on knife scales and any suggestion on whether it could be the wood or moisture?
Thanks
dkg replied:
I do not think that moisture or or the wood is a problem. It might be the epoxy. I have used West epoxy for quite some time. When joing wood, I use the 207 part B because it is compatable with different finishes. I also use a powder adhesive mixed in with the mixed part A and part B. I mix the adhesive until a get a cool wihip consistency. You have about 20 minutes to work with the stuff.
TopamaxSurvivor replied:
Let us know what you find out. I haven’t done this yet, but am planning to give it a try. thx.
coloradoclimber replied:
Thanks for the replies. I guess I’m gonna give a different epoxy a try. I used a 2 part slow set from Walmart, I guess that should have been my first clue 🙁
I did try roughing up both the scale and the tang. I rubbed both on 100 grit sand paper on a flat surface. Mostly to flatten them, remove any burrs, and rough them up a little.
I did wipe both the tang and the scale with acetone before applying the the epoxy, maybe 15 minutes or so before applying the epoxy.
I’ll see if I can hit Rockler tomorrow and pick up some West Systems. If I cant find any I’ll look for the Raka.
I’ll post back after I get them re-epoxied and give them a chance to work or fail.
Thos. Angle replied:
I did the 2 knives in my projects with two part epoxy that comes in the syringe type tubes. I don’t think I clamped it very long but I did make sure it was in the pin holes as well as on the steel and wood. I don’t think I sanded the back of the scales any at all. I carry the folder in my pants and have carried the belt knife as well. I think it must be the glue.
papadan replied:
My guess would be the epoxy you used. I have used the slow setting and 5 minute types to put golf club heads on, always a steel shaft and heads of wood and metal. Never had one come loose. Don’t know the brands off hand, usually buy it at the borgs. You stated that most of the epoxy stuck to the wood and not the metal, so that rules out problems like oils in the woods.
coloradoclimber replied:
Hmmmm, Dave you might be onto something.
I thought maybe I might have clamped them too hard, as in “I squeezed the hell out of it”.
I had three jorgensen bar clamps per knife handle and I had them cranked down pretty much as hard as I could screw them down, seriously cranked. I figured the tang was flat, the scale was flat, I didn’t want a big seam of epoxy showing so squeeze it till the seam pretty much disappeared. Maybe too much :). I’ll get some better epoxy and maybe go a little bit gentler on it on the re-glue. thanks for the ideas
coloradoclimber replied:
Well that makes sense too. I give that a try, maybe rout / dremel some grooves in the scale so I can keep some registration surfaces but still add in some volume for the epoxy.
That’s why this is such a great site. Lots of good ideas and good people quick to share.
interpim replied:
I have had real oily woods not take epoxy before…
I was using a decent quality epoxy too. I noticed that when the epoxy heated as it cured it pulled the oil to the surface that was being glued and ended up pushing the epoxy away from that surface.
TopamaxSurvivor replied:
Do you know what brand the Walmart epoxy is?
coloradoclimber replied:
The Walmart epoxy comes in two side by side syringes and has “2 Ton Clear Weld Epoxy” written on it, made by ITW Performance Polymers, Riviera Beach, FL.
Another thing I noticed. The epoxy did not stick to the tang at all. Even where there was squeeze out in front of the scale on the the blade. I picked at the squeeze out with the tip of my pocket knife and it flaked right off the steel.
So I’m not sure what is going on with the epoxy bond, or lack of bond, to the tang. I’m going to try to rough up the tang a little extra, make sure I clean it well with acetone, and try some “better” epoxy.
Moron replied:
do u hav a picture?
John Gray replied:
Picture? Did you pin it too or just use epoxy? What kind of wood did you use?
coloradoclimber replied:
The handles are drilled for pins and a lanyard, but I did not put the pins in yet. I wanted to shape the handles with a rasp first, then glue the pins in, then hit it with a final pass over the spindle sander.
The woods are Wenge, Cocobolo, and Chakte Viga. The wenge seems to be holding strong, the chakte popped right off, and I had to pry a little bit to get the cocobolo off, but it was already starting to pull away from the steel.
Here are some pictures of the scales after coming loose. The first two are of the Chakte, they pulled away perfectly clean, not a bit of epoxy stuck to the tang. The cocobolo left some epoxy behind but a good portion was unstuck. The last picture is of the pins and lanyard tube to be installed after I finish getting the handles rough shaped.
You can see the epoxy squeeze out at the top of the handle where it just came right off of the steel. I did wipe down the steel with acetone before putting on the epoxy.


TopamaxSurvivor replied:
I have never had epoxy fail to stick to metal. Never heard of it before, but I think I’ll avoid “2Ton epoxy” :-))
Ger21 replied:
You must have still had a film of some sort on the steel for it not to stick. One other thing you can do, with the thinner epoxies mentioned, is to wet sand it into the steel with 60 or 80 grit sandpaper. You can do this to the wood as well. West System recommends it for a better bond.
MOJOE replied:
you might try to “rough up” both the tang and the scales prior to placing the epoxy. That will give it something to bite in to. also, i think cocobolo tend to be a little oily…..might have something to do with it.
Mark A. DeCou replied:
I sent you an email with my opinon on the solution.
m
PM 1:
I don’t think the problem is the wood. Two part expoxy does not bond well to metal. I use peened end rods to make rivets to hold handles on. You could try using JB Weld, it is designed to glue metal, and might just work.
If you had several holes through the metal, so that the epoxy would make rivets with the glue, that might help, but probably will break later. I also mix my epoxy according to what property I want. If I want it to be a little rubbery, I use less hardener. Leaving it rubbery won’t allow it to bond metal even then. There are some plastics, metals, and glass that two part epoxy just doesn’t bond well with. You need pourous materials to get a really good bond, and then I don’t squeeze too hard with clamps so that there is a film of glue left. It works and bonds completely different than PVA woodglue.
Another option might be some F26, that stuff bonds to about everything.
Mark A. DeCou replied:
I’ve not had trouble with any of these woods, using any type of epoxy. But, it does not bond well to metal. I use peened head rivets to hold on the scales. For metal adhesion, I recommend JB Weld, or F26 glue might be a solution.
PM 2:
Are you using rivets to hold the wood tight?
Knifemakers either use peened-end sold rivets, or use the newer style threaded rivets with thread glue. I have used both, the peened end are slow, and you take the risk of splitting the wood, or putting dents in the wood if you miss the rivet. I just did a peened rivet in black ebony, and I was very worried about splitting, especially since the epoxy was just a decorative tip of wood on the end of the handle. But, I slowly did the job, and it worked fine.
To peen, I put the nickel-silver, or brass, rod in a vise and gently tap the end with a small round head fo a ball peen hammer. As you tap several dozen times, the end will mushroom out. Then, I cut the rod to length, stick it through the drilled hole, and tap the other end. This mushrooming of the ends will hold it like a nail head, and you just keep driving it down until it tightens up against the wood. It’s sort of fun really, if you like doing little tedious tasks that require extreme precision. I do, so I like it.
The threaded rivets are expensive, but are easy enough to do. I don’t like them as well as they are a bigger diameter, and many knife makers snub their nose at guys that use the simple threaded rivets. But, they work fine, and so I recommend them as well. Knife maker supply catalogs all have the threaded rivets for sale, they are easy to find.
Without the constant pressure of the rivets, I have seen that over time, epoxy will not hold wood to a piece of stainless.
I just did a knife this week, and used three peened nickel-silver rivets. The epoxy held just fine at this point, but I’ve seen over the years that the wood moves.
This shows up with the wood either protruding past the tang, or shrinking from the tang. Add some water from washing blood off the knife, or rain, and before long the scales will pop off one day.
When you make the knife you sand the metal and wood to the same profile. But as the wood moves over the seasons, the wood won’t stay perfectly aligned with the steel. That movement will pull the epoxy off the steel.
I don’t clamp my scales at all, I just hold them with firm pressure until the glue turns rubbery, and then I clean up the squeeze out before it gets hard. Right after the expoy is stringy, it turns rubbery, and cleans up really well. Let it sit another minute or two, and it is much more difficult to clean up the squeeze out. It’s really interesting material.
Many knifemakers use resin or epoxy impregnated wood, which is very stable against seasonal changes. They put the wood and expoxy in a vacuum chamber and pull out all of the air, which sucks the wet epoxy or resin into all of the voids, making it a solid. This type of knife scale wood is called “impregnated” or “stabilized”. I don’t use that since it’s pretty expensive, but I know many knifemakers do use it.
There are many books and video tutorials you can buy that explain the process of riveting and gluing and such. Many years ago when I started it, I bought a couple of books and a video, and then have learned on my own from there. But, I do encourage buying some resources when first learning something new, saves a lot of trial and error.
I’ve taken photos over the years of all of the steps to do a knife, and I have thought I would post it as a blog tutorial. But, there are many tutorials that a guy can buy from a catalog, so it seems useless really to go to all the trouble to type up another one, which take many many hours to do properly.
enjoy your week,
m
toddhelmkamp PM’ed:
Hey Brad,
Thanks for the compliments! I posted a reply on the thread you started, but I’ll put it here too.
I don’t use epoxy anymore, I use Gorilla Glue. This stuff is the bomb. Cures in 1 hour, is a polyurethane glue. The neat thing about it is that you don’t have to worry about clamping too tight. On a porous surface like wood, it will actually expand into the pores if you have it clamped tight. It reacts to moisture, so it helps to light dampen the inside of the scale and the tang before you glue it.
I’ve used it on quite a few knives and have actually tried to make it fail with no effect. I’m sure if I wanted to I could get the scales off, but man that stuff is tough!
Here is a link with some tricks and tips and more info on it: http://northcoastknives.com/northcoast_knives_tutorials_hints_tips15.htm
Let me know how it goes!
— Todd Helmkamp, http://www.thornhillknifeworks.com
coloradoclimber replied:
Mark, thanks for the PM. And thanks everyone else for the suggestions.
I’m leaning toward some / all of the fault being mine.
I decided to do a little more research now that 6 of the 8 scales have failed. I looked into getting some West System but the only place around here that has it is Rocker which is 50 miles away, each way, and only has it in quart sizes, so I end up with a half gallon of epoxy at $85 USD. Too far away, too much epoxy, too much money.
Woodcraft carries a product called T-88 Structural Epoxy Adhesive by System Three. Woodcraft is 12 miles away, has it in a half pint size, and it costs $17.50 USD. All three a better fit for me.
System Three has a free PDF book called appropriately The Epoxy Book. In the section on techniques of epoxy use they have a bullet point:
“Third, do not over-clamp. Epoxy resins require only contact pressure.
Over-clamping can squeeze most of the adhesive out of the
glue joint and the epoxy that is left is absorbed into the wood
starving the joint. A glue-starved joint is very weak. Use only
enough pressure to hold the joint immobile and keep the two
surfaces in contact until the epoxy has set overnight at normal
temperatures. Nails, screws, clamps, rubber bands, or staples can
all be utilized.. Clamp just hard enough to close up the joint.”
And as I state above. I OVER CLAMPED the scales pretty hard. I put 3 Jorgensen bar clamps per handle, 3 was about all I could fit, and I CRANKED them down, hard. I was going for a near invisible handle to tang glue joint and I got it. The joint was paper thin or less. Pretty much you couldn’t even see the glue joint before the scales popped off. That’s how I cold tell the other scales were going bad. I could see a hairline joint at the scale to tang surface.
So at this point I’m willing to believe some (or most) of the fault lies with me. I’ll be trying again tomorrow with the following procedure:
– Rough the tangs a bit more aggressively. Maybe hit them a stoke or two with a bench grinder, or maybe just a bit more aggressive on some 100 grit sandpaper.
– Dremel some shallow grooves in the back sides of the scales to hold a bit more epoxy.
– Rough up the scales on some 100 grit sand paper.
– Wash both the scale and tang with acetone.
– Use better epoxy.
– Clamp the much more gently.
And we’ll see what round two brings. I’ll update on the success or failure of this new attempt.
Ger21 replied:
Just to clarify, with the West System, you won’t get a half gallon. The resin is a quart, but the hardener is only about 1/2 pint, as the ratio is roughly 5:1. The resin and
hardener at Rocker is about $55 for both, + the pumps.
Also, West System has surface prep info specific to materials.
http://www.westsystem.com/ss/surface-preparation/
toddhelmkamp replied:
I think you’re on the right track. Over clamping is a big problem with epoxies. Honestly, I’ve used epoxies and I don’t really care for them. I’ve been using Gorilla Glue, which is a polyurethane. Honestly, I’ve tried to break scales off when I used Gorilla Glue and have had a hard time. A little bit goes a long way though, as it expands as it cures. I like it for wood-to-metal bonds. You want to clamp the scales hard with it though, because as it expands it will actually expand into the pores of the wood. I use the white 1-hour fast cure type. Don’t use the super glue, its completely different. I’ve used the Gorilla Glue successfully on about 15 knives now with no problems.
For a discussion of different adhesives for knifemaking, check out this article by Pat over at Northcoast Knives:
http://northcoastknives.com/northcoast_knives_tutorials_hints_tips15.htm
Good luck!
TopamaxSurvivor replied:
Those sources seem a bit spendy if you’re just dong a few. I have always had good luck using Locktite brand epoxy.
toddhelmkamp replied:
That’s another reason I love Gorilla Glue. $5 a bottle, and a bottle will do many knives. 🙂
coloradoclimber replied:
I got the scales epoxied back on. I ended up using the T88. I put the lanyard tube and two of the scale pins in to line up the scales. I mixed a fresh batch of epoxy for each knife, smeared a good coat on the tang and scale, coated the pin holes and pins, put it all together, wrapped it in wax paper, and used rubber bands to hold it together to cure. Here is what a couple of them looked like coming out of the wax paper after 24 hours.
Chakte glue up

Cocobolo glue up

toddhelmkamp replied:
Lookin’ good. I too would like to see them when you’re done!
— Todd Helmkamp, http://www.thornhillknifeworks.com
coloradoclimber replied:
Making some progress on the handles. Got all the epoxy rasped and sanded off. Got the pins and lanyard tube cut off and sanded down. The other pin hoes are drilled out. Still need to cut the rest of the pins, fit them, and glue them. Then the final shaping and finishing. So far the new epoxy and gluing technique is holding strong. More epoxy and less clamping force seems to be the watch words.
Here’s what they look like so far.
Chakte Viga

Wenge

Cocobolo

toddhelmkamp replied:
Beautiful! What will you use to finish them?
— Todd Helmkamp, http://www.thornhillknifeworks.com
coloradoclimber replied:
yeah, I’m a lot happier now. It looks like things are going to hold together this time. I still have a bit of work to get them finished but I feel better about the glue up.
They are gonna be a little late for Christmas presents but I usually only hit about 50/50 on time delivery for home made Christmas and birthday presents anyhow. People who get gifts from me have come to expect it 🙂
Thanks again to everyone who chipped in on the epoxy problem. It’s good to have people to bounce ideas around.
coloradoclimber replied:
Todd, good question, unfortunately I don’t yet have a good answer.
This is my first attempt at putting together a knife and I have not thought that far ahead. Any suggestions? I probably would have ended up with my old standby, soak in tung oil, let cure, and then maybe a coat of poly for some durability?
I could shellac, buff, and wax. The chakte and cocobolo seem to have enough oils and wood density that a buff and wax would probably create a deep shine. The wenge is probably going to require something more. I’ll probably oil the wenge then maybe try to buff and wax.
Since this is something expected to be handled and probably have a sheath strap around the handle it seems like it needs to be a durable or penetrating finish. I’ll do a little more internet research and see if I stumble across any specific finishing tips. Or maybe I’ll post another question on LumberJocks “How do you finish your knife handles?”. Thanks again.
toddhelmkamp replied:
Tung oil is really good to use. It will sink in and harden somewhat. I recently started using a three-step finish from Dem-Bart. It starts with a few coats of oil, then a sealer, and then a light wax. I bought it from Jantz Supply (jantzsupply.com) I’m really happy with it. You can also try Birchwood-Casey Tru-Oil, that works too.
— Todd Helmkamp, http://www.thornhillknifeworks.com
SteveCo replied:
You’ve inspired me to try my hand at knife making, we have a local woodcrafters and I have seen some of the kits. I am new here, this is a wonderful place to get inspiration and ideas.
Thanks
toddhelmkamp replied:
Hi Steve, and welcome! I love knifemaking. Soon I hope to make my own blades! Just waiting on some more tools.
Woodcrafters is great, I buy a lot of things there, but you can find blades a lot cheaper elsewhere. Check out jantzsupply.com and northcoastknives.com.
Good luck and enjoy!!
coloradoclimber replied:
I got around to adding the rest of the pins to the handles. I bought some brass rod from the local hardware store and it turned out to be a little too big. I did not want to split the scales trying to force the pins in so I turned them down a few thousands.
It turned out to be pretty easy. I sawed off the pin from a longer rod, chucked them up in the drill press, and just held a file to them. I kept the knife handy to size the pins and when they fit nicely I flipped them over in the drill and filed the other end.
Turning the pins down


After the pins where sized I epoxied the pin holes and pins, put the pins in the handles, and mounted them in my custom knife holding drying jig.
Letting the epoxy dry


Now just need to let the pins dry, belt sand them down, then smooth and finish them.
Ger21 replied:
Don’t let them get too hot when sanding them down. Heat will break down the epoxy. Might be better to hacksaw the majority of the waste off, or cool them often with water.
— Gerry, http://home.comcast.net/~cncwoodworker/CNC_Woodworker.html
toddhelmkamp replied:
Good idea for turning the pins down! And Gerry is spot on, I’ve actually burned a few knife handles in the pin area by grinding the pins too long.
— Todd Helmkamp, http://www.thornhillknifeworks.com
roadrunner0925 replied:
i dont understand how to go about shaping the wood around the tang. i think my thought process is off base. would someone please help me understand?
toddhelmkamp replied:
Hey Roadrunner,
Usually I just get the scales (handle pieces) approximately the size and shape I want using a coping saw. After that, I glue them, drill the pin holes, set the pins, and let everything dry. Once its dry, I shape the handles closer to the tang and give them more of their final shape with a rasp. Once I’ve done that, I finish the shaping with a reciprocal sander held upside down in a vise. Most people that actually have the tools use a belt sander.
Did that answer your question? If not, please let me know and I’ll try to clarify!
— Todd Helmkamp, http://www.thornhillknifeworks.com
roadrunner0925 replied:
my biggest concern is using any tool for wood that close to metal. what happens when/if the sander hits the tang? is there any marring of the tang? accidents happen and quite frankly, I’m not that accurate(sanding right up to the tang) its just hard for me to understand working with wood and metal in that close of a proximity to one another. am i over cautious or still misunderstanding something? your help is very much appreciated. wm
toddhelmkamp replied:
Hey Roadrunner,
It is possible to scratch the tang with the sander, but if you’re careful it shouldn’t be a problem. Remember to wear eye protection!! If you do scratch the metal, it’s pretty easy to polish out with some emory cloth and different grades of steel wool.
Usually what happens on mine is that the wood gets sanded right down to the metal, and rather than the metal getting the scratched, the metal gets a nice bright finish that I touch up with steel wool and a buffer.
For more info, here is a tutorial from Pat at Northcoast Knives. He gives some excellent instructions, and has a lot of great supplies for sale.
http://www.northcoastknives.com/northcoast_knives_tutorials_fulltang.htm
coloradoclimber replied:
Roadrunner, Actually I sand right down to the tang, and more. I use a belt and spindle sander and it sands away the metal tang just like the wood scales. The nice part of using the sander is the scales are sanded seamlessly right to the tang.
As for scratches, after using the belt sander I move to finer grit sand paper, still sanding the scales and the tang, finer and finer, and then polish. The tang polishes up shiny and bright just like scales.
I don’t use a rasp. I think I would be concerned about hitting the tang with a rasp. Not about hurting the tang but more worried about ruining the rasp. Power sanders are your friend when shaping a knife handle.
gandolfofburls replied:
acetone., that could be the problem…(not saying it is) here is a trick to find out. lay your blade down, wipe part with water, part with acetone, and part with lets day….etching fluid or lemon juice. now take a couple popcycle sticks, ruff them up with sand paper and then glue them to your blade., (leave them over hang the blade a inch or two) then let cure….now grab hold and twist and pry to see wich holds and wich doesnt. also test other glues…find the one that does the best job and now you are a expert. (give a man a fish, or teach him how) i just love fishing anologies! lol hope this helps. G
Loco replied:
Old thread but when you’re fooling with rosewoods and cocobolos, ebony etc. quit screwing around with pins, “rivets and the others. Get some Loveless style bolts and still use the epoxy as a water barrier.